

Building a backyard ice rink is easier than you might think and costs between $100 and $750, depending on size and materials. You’ll need a flat area, lumber for the frame, a heavy-duty plastic liner, stakes for support, and access to water. Start in late fall before the ground freezes, and wait for consistent temperatures below 32°F to fill the rink. Here’s a quick breakdown of the process:
- Choose a flat location: A level yard minimizes costs and effort.
- Build the frame: Use 2x10 or 2x12 boards, secured with stakes and brackets.
- Lay the liner: Use a white or clear polyethylene liner, 4–5 feet larger than the frame.
- Fill with water: Ensure at least 3 inches of ice for safe skating.
- Maintain regularly: Clear snow, resurface with hot water, and check for debris.
A backyard rink offers a fun, screen-free way to enjoy winter and connect with family and neighbors. With proper setup and upkeep, you can skate from late November to mid-March. Ready to get started? Let’s break it down step-by-step.
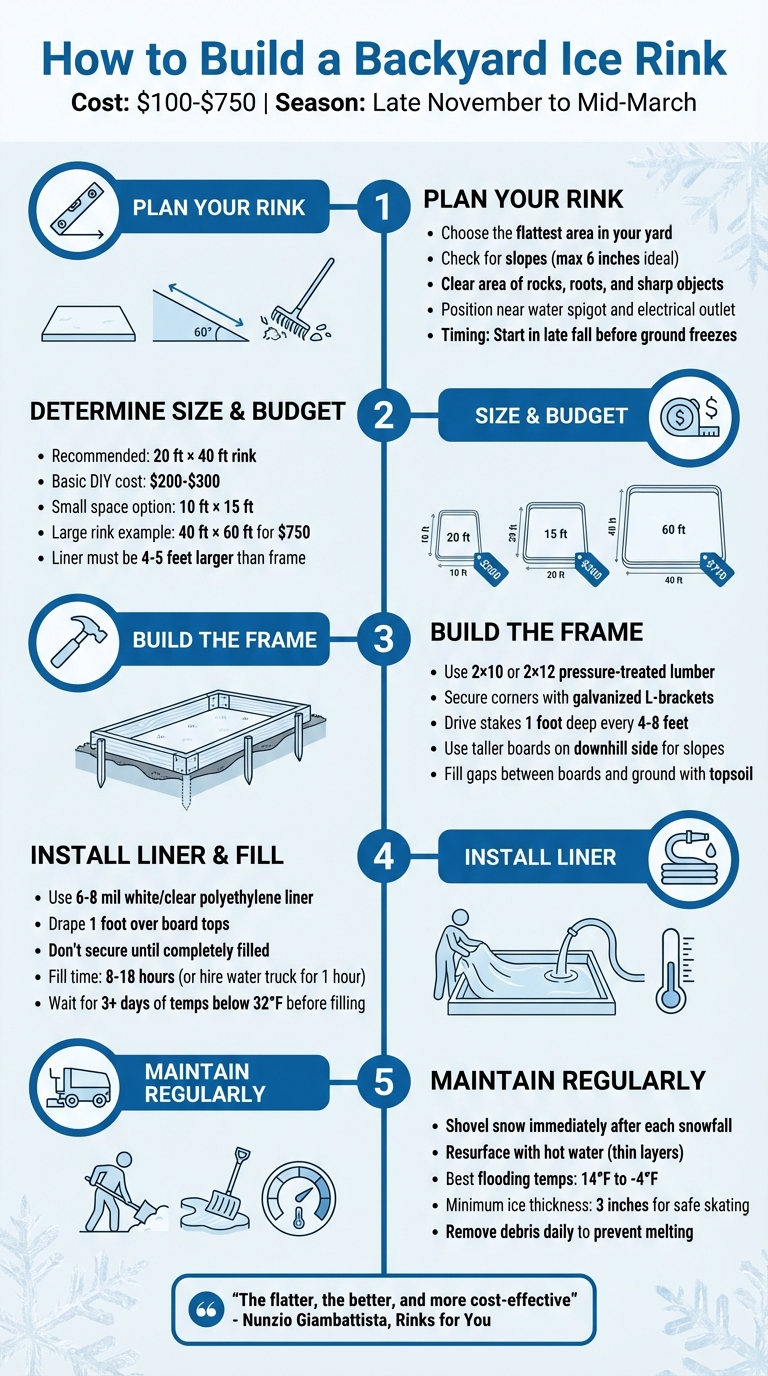
How to Build a Backyard Ice Rink: 5-Step Process Guide
Planning Your Ice Rink
Choosing the Right Location
When planning your rink, look for the flattest area in your yard. Use stakes and string to outline the space, then check for any slope using a level. If the yard slopes more than 6 inches, you’ll need taller boards at the lower edge. For slopes over 18 to 24 inches, brace yourself for higher costs and added complexity. Clear the area of anything that could damage your liner, like sprinkler heads, tree roots, rocks, or sharp objects.
"The flatter, the better, and more cost-effective" - Nunzio Giambattista, Founder and Owner of Rinks for You
"An area that is as level as possible to ensure even ice thickness and prevent water from pooling on one side" - Jenn Nawada, Landscape Contractor at This Old House
If possible, choose a shaded spot to reduce ice melting caused by direct sunlight. Also, position your rink close to a water spigot and an outlet for lighting. Once you’ve cleared and leveled the site, decide on the rink's size and budget based on your family’s needs.
Determining Size and Budget
For most families, a 20 ft. by 40 ft. rink is a great option, with basic DIY builds costing between $200 and $300. This estimate includes materials like lumber, a liner, and stakes . If you’re working with a smaller yard, even a 10 ft. by 15 ft. space is enough for practicing hockey shots. Larger setups or sloped yards will naturally require more materials. For example, one Michigan homeowner built a 40 ft. by 60 ft. rink for about $750, which included a 50 ft. by 100 ft. liner.
When buying a liner, make sure it’s 4 to 5 feet wider and longer than the frame to account for water depth and board height. If your yard requires over 18 inches of water at the deep end, plan for taller boards and extra bracing, which will increase costs.
Weather and Timing Requirements
After deciding on the site and budget, it’s time to think about the weather. Don’t fill your rink until you’ve had at least three consecutive days of temperatures at or below 32°F. The best freezing range is between 14°F and -4°F for several days.
Start building the wooden frame in late fall before the ground freezes solid, but hold off on laying the liner until just before the first sustained freeze to prevent debris from collecting. Filling the rink can take anywhere from 8 to 18 hours, depending on its size and your water pressure. Once filled, let the ice thicken to at least 3 inches before skating.
In colder states like Minnesota or Michigan, you can typically start building in late November. If you’re in a warmer area, your skating window might be limited to a few weeks in January or February.
sbb-itb-d0a8c9d
Materials and Tools You'll Need
Boards and Supports
To build the perimeter frame, go for 2 in x 10 in or 2 in x 12 in pressure-treated lumber or spruce boards. Pressure-treated wood is a solid choice because it withstands harsh winter conditions better. Avoid plywood - it flexes too much and breaks down quickly. Secure the boards at the corners using galvanized L-brackets, tie plates, or 3-inch deck screws. To keep the frame sturdy against water pressure, drive 2 in x 2 in wooden stakes (deck balusters work great) or iron stakes at least one foot into the ground every 4 to 8 feet along the perimeter. For added stability, you can reinforce the frame with extra metal brackets. These materials are easy to find at most home improvement stores or online. Once the frame is ready, pick a liner that fits properly to hold the water and reflect sunlight effectively.
Rink Liner and Insulation
A white or clear polyethylene liner, 6-mil to 8-mil thick, is essential for holding water and reflecting sunlight. Stay away from darker-colored liners - they absorb heat and can cause the ice to melt faster:
"Darker colors will absorb heat and make the ice melt faster on warmer winter days."
– Jean Levasseur, DIY Enthusiast
Make sure the liner is 4–5 feet larger than your frame on all sides. For example, a 20 ft. x 40 ft. rink would need a liner about 25 ft. x 45 ft. Before laying it down, clear the ground of any sticks, rocks, or sharp objects that could puncture the plastic. Use 2-inch spring clamps to temporarily secure the liner during filling, but don’t fasten it permanently until the rink is full - this avoids tears caused by shifting as the water fills.
Water Supply and Maintenance Tools
You can fill the rink using a garden hose, though larger rinks might take up to four days to fill. If you’re short on time, consider hiring a water truck for $100–$200 to get the job done in about an hour. To prevent freezing, store your hose indoors or use a frost-free hose bib rated to –30°F. For maintenance, keep a wide snow shovel, a flat ice scraper, and a resurfacing tool on hand. A simple DIY resurfacer made from PVC piping works well. While filling the rink, cover the end of your hose with a rag or sock to protect the liner from damage caused by water pressure.
How to Build Your Ice Rink
Preparing the Site
Start by selecting the flattest area in your yard - ideally close to a water source and an electrical outlet. Use a level to check for slopes. If the slope is greater than 6 inches, you may need to level it out. Slopes between 18 and 24 inches will require extra materials like water, lumber, and bracing. Clear the area of snow, leaves, twigs, rocks, or anything sharp that could damage your liner. Mark the rink's perimeter using stakes and string or spray paint. For minor uneven spots, fill them with topsoil or hay bales. As Nunzio Giambattista explains:
"You can turn to lumber and wood to even out the rink, you can add soil or you can even use hay bales to 'even out the low spot of your yard.'"
Timing is key - start building in late October or early November before the ground freezes. Frozen ground makes it harder to drive stakes into the soil. After setting up your frame, inspect the bottom edge and fill any gaps between the boards and the ground with topsoil. Avoid using snow for this, as it can melt and cause leaks or "bladders" under the liner. Also, steer clear of building over septic tanks or drain fields. Once your site is cleared and leveled, you’re ready to build the frame.
Building the Frame
Place your boards along the marked perimeter and use a laser or line level to mark level lines, often referred to as the "ice line." This ensures a level skating surface, even on sloped ground. Use taller boards, like 2×12, on the downhill side and shorter boards, like 2×6, on the uphill side to maintain an even surface.
Chris Palmer, a handyman, adds this advice:
"If the ice is only 3-4″ thick on one side but has to be 8-12″ thick on the other, you're fighting yourself."
Secure the corners with galvanized L-brackets or metal tie plates and fasten them with 3-inch deck screws. Make sure the frame is square by checking diagonal measurements. Install screws from the outside pointing inward to avoid sharp points that could puncture the liner. Drive stakes into the ground every 4 to 8 feet along the perimeter, ensuring they go at least one foot deep to handle the outward pressure of the water. Walk around the frame and fill any remaining gaps with dirt. Once your frame is solid and squared, you’re ready to lay the liner and start filling.
Installing the Liner and Adding Water
Lay the liner loosely inside the frame, making sure it reaches the bottom and drapes over the top of the boards by at least 1 foot. This extra material helps accommodate the weight of the water and any ice expansion. Don’t secure the liner with staples or fasteners until the rink is completely filled - doing so too early can lead to tears as the water shifts.
There are two ways to fill your rink. The single-fill method involves filling the entire rink in one session until the shallowest area has at least 2–4 inches of water. This works best on level ground during a deep freeze. The layered-flood method, on the other hand, involves adding water in 1–2 inch increments, allowing each layer to freeze before adding the next. While this takes more time, it results in stronger ice and works better on slightly uneven surfaces.
When filling, aim the water upward and outward to reduce ripples. According to D1 Backyard Rinks:
"Using hot water makes a big difference in the quality of the ice because it contains less dissolved oxygen – or micro air bubbles – which aids in creating a harder ice surface."
Fill the rink until the shallowest point has at least 3 inches of solid ice - this is the minimum thickness for safe skating. If using a garden hose, it can take up to four days to fill a larger rink. Alternatively, you can hire a water truck for around $100 to $200 to get the job done in about an hour. Once the rink is filled, detach the hose to prevent it from freezing, and wait for 3–4 consecutive days of sub-20°F temperatures before hitting the ice.
Maintaining Your Rink Throughout Winter
Daily and Weekly Maintenance
Keeping your rink in top shape through winter requires consistent effort. Start by clearing snow immediately after it falls using a lightweight shovel or snow pusher. Wet snow can freeze into uneven bumps, making the surface difficult to skate on. As handyman Chris Palmer puts it:
"Wet snow always ruins the surface."
Leaves and twigs can also cause trouble by melting the ice and forming pits. Remove them as soon as possible. If debris has already frozen into the surface, carefully chip it out with a screwdriver or ice pick to avoid further damage.
Resurfacing is another key task. Apply thin layers of hot water regularly to create smoother, harder ice. Hot water works better because it contains less dissolved oxygen, producing clearer ice. When flooding, spray the water lightly upward and outward for even coverage. Avoid heavy streams, as they can crack the ice. If it takes more than 15 minutes for a layer to freeze, you’ve likely used too much water. The best time to flood is at night when temperatures range between -4°F and 14°F.
Before resurfacing, scrape off ice shavings and burrs using a flat garden scraper or wide shovel. Pay special attention to filling low spots first, ensuring water reaches these areas before freezing. For deeper cracks or rough patches, a handheld watering can with hot water can help with precise leveling. Regular care not only improves the ice quality but also extends the life of your rink.
| Maintenance Task | Frequency | Purpose |
|---|---|---|
| Shoveling | After every snowfall | Prevents bumps and "shell ice" |
| Scraping | Before every flood | Removes ice shavings and burrs |
| Thin Flooding | Daily or after heavy use | Fills in skate blade grooves |
| Debris Check | Daily | Prevents sun-induced melting and pitting |
Once your daily maintenance is done, take a moment to ensure the rink is safe for skating.
Safety Tips
Before letting anyone lace up their skates, perform a quick "shoe test." Walk on the ice in regular shoes - if it supports an adult without water seeping up the sides, it’s ready for action. Always aim for a minimum ice thickness of 3 inches to ensure skating is safe.
Keep an eye on the boards, especially after heavy use or big temperature swings. Water pressure is strongest at the lowest elevation points, so reinforce these areas with extra stakes if needed.
Optional Upgrades and Additions
Want to take your rink to the next level? Try these optional upgrades. Push cleared snow behind the boards to create natural backstops for hockey goals - this keeps pucks in play and makes games more fun. Cover your rink with a lightweight tarp when it’s not in use to keep snow and debris off the surface, making your daily maintenance much easier.
For those maintaining larger rinks or resurfacing frequently, consider investing in a home resurfacer. These Zamboni-style attachments, priced between $250 and $300, can save you time and effort. While not a necessity, they’re a handy addition for serious rink enthusiasts.
How To Build a Backyard Ice Rink | Ask This Old House

Conclusion
Creating a backyard ice rink turns winter into a season of outdoor fun and activity. The process is pretty straightforward: choose the flattest area in your yard, build a frame using pressure-treated lumber, lay down a sturdy liner, and fill it with water during a cold spell. To keep your rink in top shape, make sure to shovel snow regularly and resurface the ice as needed.
But the magic of a backyard rink goes beyond the setup. It’s about the connections it fosters. As Nunzio Giambattista, Founder and Owner of Rinks for You, explains:
"The biggest benefit of a backyard ice rink is getting active and 'off screens and social media.'"
Your rink can become a gathering spot, bringing neighbors together and helping families create cherished memories. Just look at the Ann Arbor DIY rink that drew two dozen skaters the day after Christmas - it’s a perfect example of how a simple project can bring people closer.
With an investment ranging from $100 to $750, you can build a rink that offers so much more than just skating - it’s a space for community and joy. And while you’re out there skating or maintaining the ice, stay warm with a BirdFish nature-inspired hat.
As Jake Burton once said: "When life gives you frigid temperatures, make ice." Your backyard rink is ready to bring winter fun to life.
FAQs
When is the best time to start setting up a backyard ice rink?
The ideal time to start building your backyard ice rink is once the ground has frozen solid and you've had at least three days of consistently cold weather. Aim for daytime temperatures staying below 32°F and nighttime lows around 23°F or colder. These conditions are key to ensuring the ground and water freeze properly, giving you a solid, safe surface for skating.
Starting under these conditions also prevents water from soaking into the ground and guarantees a more even freeze - perfect for a smooth skating experience!
How can I keep my backyard ice rink smooth and safe for skating?
To keep your ice rink in great shape and safe for use, regular maintenance is a must. After every snowfall, make sure to clear the snow right away. If left, it can melt and refreeze, creating uneven areas that could trip skaters. After skating sessions, take a plastic ice scraper or a flat shovel to remove ice shavings and smooth out any ridges, keeping the surface level.
For that perfect, polished finish, lightly mist the ice with water using a garden hose. On colder days, this thin layer will freeze quickly, leaving behind a smooth, glossy surface. If you notice any rough patches, tools like a resurfacing device or even a paint roller can help apply water evenly, restoring the ice to a near-perfect condition. To preserve the rink, avoid walking on it during warmer weather and ensure the temperature stays below freezing (32°F).
By following these steps, you’ll have a smooth, safe rink that’s ready for skating fun all winter long.
What mistakes should I avoid when building a backyard ice rink?
To make sure your backyard ice rink is both safe and enjoyable, steer clear of these common pitfalls:
- Pick a flat, even surface. Uneven ground can make it tough to achieve a smooth skating surface and might limit the rink's overall size.
- Stick with a white liner. Dark or colored liners soak up sunlight, warming the water and slowing down the freezing process.
- Don’t over-tighten the liner. Leave some slack so the liner can adjust as the ice expands, reducing the risk of tears.
- Keep water depth manageable. Aim for less than 18 inches of water. It’s easier to maintain and doesn’t require extra bracing.
- Minimize direct sunlight. A shaded spot keeps the ice intact longer and slows down melting.
With a little planning and attention to detail, you’ll have a sturdy ice rink perfect for skating and making winter memories with loved ones!